Coconut Free Paleo Pancakes

Baking without coconut flour in a grain free lifestyle can be quite a challenge! Avoidance is usually the route I take. Every attempt at coconut free, grain free pancakes has ended in disaster – or something that can’t technically be called a pancake!

After months of going without Sunday brunch pancakes, I really wanted to enjoy some pancakes with my family! Making two different batters just seems ridiculous when I should be able to come up with something that meets my diet needs and that my family can also enjoy. Little did I know this was WAY easier said than done. I like coconut a lot, but my stomach and digestive system do not! But I am determined and I persisted!

These pancakes are family table worthy for everyone to enjoy!

Making these is not like flipping traditional flour pancakes however. You will need a non-stick griddle and a metal or very thin spatula . You will also need to grease the griddle in between pours of batter each time- no skimping! Start by pouring one pancake on the griddle to get the feel for how long each side takes, using lower heat for longer time. I found it helpful to use the space to the side of each pancake so I wasn’t really “flipping” them to land in the same exact spot on the griddle, but turning them over to land in the space next to where each pancake was cooking on it’s first side. The extra time at the stovetop is worth it!
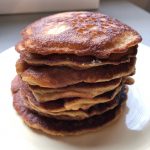
Coconut Free Grain Free Pancakes {Paleo, GF, CF}


Ingredients

  • 1 c blanched almond flour
  • 2 eggs room temp
  • 1/3 c maple sugar 2-3 drops of stevia can be used instead
  • 1/2 tsp baking soda
  • 1 tsp apple cider vingar
  • 1/4 tsp sea salt
  • 3/4 tsp pure vanilla extract
  • 2 Tbls Ghee, melted room temp
  • 1/3 cup Cashew milk or other nut milk
  • 3-4 Tbls Ghee for greasing pan

Instructions

  1. In mixing bowl, add almond flour, maple sugar, baking soda, salt and mix well.  

  2. Make a hole in the middle of the bowl and add eggs, vanilla, ghee, and half of the nut milk. Mix well. Add remaining nut milk if batter is too thick. Batter should be slightly thicker than traditional pancake batter.

  3. Preheat your non-stick griddle on medium to low heat.  Grease skillet well with ghee.  Pour a small pancake with 1/4 cup measuring cup.  Once bubbles appear on surface, check to see if pancake is ready to flip.  

  4. Using a metal or very thin spatula, gently turn pancake over and cook on second side for 1-2 minutes until golden brown.

  5. Remove from heat and enjoy!  Remeber to grease pan in between every pour of batter!

Recipe Notes

You will need a non-stick skillet and a metal or very thin spatula. The pancakes are delicate while cooking, but not delicate after they are done.

It is easist to work with very small size pancakes, so use a 1/4 cup measuring cup to pour batter on skillet to avoid overpouring.

If the pancakes are difficult to flip, lower the temp of your skillet and let pancake cook longer before flipping. It also helps to grease pan in between every pour of batter.

Spread the love

Easter Carrot Cake Cupcakes

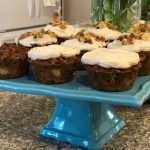
I’ve been a little obsessed with cupcakes and muffins lately! Since it was Easter and carrot cake is the obvious choice, I decided to go for it! The thing is with carrot cake, I like all the options! The pineapple, raisins and walnuts- I need all three! What I couldn’t decide, was if I liked this carrot cake with coconut sugar or the maple syrup as the sweetener. Not only does it create a slightly different flavor, it lends to a different cake texture. So, I made both! And I took votes from my Easter guests (my in-laws and family!) all of whom are non-paleo! The winner, as per all the dinner guest’s votes:

Carrot Cake Cupcakes with Paleo Frosting {GF, DF, Paleo}

These cupcakes are the real deal! Absolutely delicious!

Ingredients

  • 4 eggs room temp
  • 1/2 cup pure maple syrup
  • 2 tsp pure vanilla extract
  • 1 Tbsp lemon juice
  • 1/4 cup coconut oil, melted Add to batter LAST
  • 1 1/4 cup blanched almond flour
  • 1/4 cup tapioca flour
  • 1/4 cup coconut flour
  • 1 tsp baking soda
  • 1/4 tsp salt
  • 4 tsp ground cinnamon
  • 1/8 tsp nutmeg
  • 1/2 tsp ground ginger
  • 2 cups shredded carrots
  • 1/2 cup raisins
  • 1/2 cup walnuts, chopped optional
  • 1/2 cup crushed pinneapple NOT drained

Frosting:

  • 1/2 cup organic palm oil shortening
  • 1/3 cup coconut oil, melted- room temp
  • 1/4 cup raw honey If crystalized, melt and cool to room temp
  • 1/3 cup tapioca flour
  • 1/8 tsp sea salt

Instructions

Cupcakes

  1. Preheat oven to 350 degrees.  Prepare muffin pan for 12 muffins

  2. Melt coconut oil and set aside.  *add this at end of batter or it will harden and clump*

  3. In a small bowl, mix all dry ingredients (Flours, soda, sale, cinnamon, nutmeg and ginger),  Either sift or use a whisk to make sure all clumps have been broken down.

  4. In a mixing bowl, beat eggs and maple syrup, lemon juice and vanilla until well combined.  Add in dry ingredients and mix briefly.  Add in coconut oil and mix briefly.  Fold in shredded carrots, pinneapple, walnuts and raisins until incorporated.

  5. Fill muffin cups to top, but do not overfill, they will rise slightly.

  6. Bake for 22-24 minutes or until done in center.

  7. Remove from oven and cool in pan until can be transferred to wire rack to cool completely.

Frosting

  1. Add salt to coconut oil, so it can start to dissolve. Measure out all ingredients.

  2. In a mixing bowl, beat shortening to soften.  SLOWLY, add melted coconut oil to incorporate with the shortening.  I started by adding about 1/3 of the cocnut oil to the mixing bowl; if not mixing well, scape the bottom of the bowl and the sides down with a silicone spatula and turn the mixing speed up.  Slow mixer down and add another third of the cocnut oil, beat slowly, scrape side and turn mixer speed up.  Slow mixing speed down and add remaining coconut oil and beat until creamy.
  3. Add honey and vanilla to mixing bowl and mix until combined.  Add tapioca flour and beat until creamy.  

  4. Frost cupcakes!  If frosting is thinner than desired, it can be placed in refrigerator to harden.  If using a piping bag, the heat from your hand will require the piping bag be placed back in the refridgerator half way through.  I also use more frosting in a piping bag than with a decorating knife, so you may want to double the recipe if planning on using a pastry bag.

  5. Store leftover cupcakes in referigerator or they also freeze well and pull out as needed!

Enjoy!

Spread the love

Baking Bread

A quick bread that holds up to the demands of a sandwich or tastes great on its own, in less than an hour! What’s not to love? This bread is so versatile! Great as garlic toast or with strawberry jam!

Quick Bread {Paleo, GF, DF, Coconut Free}


Prep Time 5 minutes
Cook Time 45 minutes
Total Time 50 minutes

Ingredients

  • 4 eggs room temp
  • 2 tbsp avocado oil
  • 1/4 cup cashew or almond milk
  • 1 3/4 cup blanched almond flour
  • 1/3 cup tapioca starch
  • 1/2 + 1/4 tsp baking soda
  • 1 1/4 tsp cream of tartar
  • 1/4 tsp salt

Instructions

  1. Preheat oven to 350 degrees and prepare loaf pan by lining with parchment paper.
  2. In mixing bowl, beat eggs, oil, milk.  In a separate bowl, whisk together dry ingredients until well combined.  On low speed, add dry ingredients to mixing bowl and mix until combined or smooth.

  3. Pour into prepared loaf pan and bake for 40-45 minutes, until top is golden brown and center is firm.

  4. Remove from oven and let cool in loaf pan for at least 15 minutes before transferring to wire rack to cool completely.

Recipe Notes

Use bread knife to cut. I have had good luck freezing this bread, sliced. I place parchment paper between the slices and store loaf in a gallon size ziplock bag. Parchment makes it is easy to pull a piece out as needed, and keeps the bread from touching the plastic.

Spread the love

Lazy Sunday

There is still so much snow here in Minnesota! It’s been a long winter and the days of sunshine, green grass and kids running outside seem like a distant fantasy. When my three boys are running indoors like a heard of elephants and nerf darts are whizzing around my head, its time for me to disappear in the kitchen and sip my King Coffee and bake some happiness! Today, I set out to make a grain free muffin that was also coconut free. And its a good thing I took pictures of them fresh out of the oven, or I would have none to share, they were gobbled up so fast!

Orange Chocolate Chip Muffins {GF, DF, Paleo, Coconut Free}

These are a denser muffin with a moist texture, and could be used as a cupcake if topped with frosting.  They are not delicate and hold their shape after cooling.  

Course Breakfast
Servings 12
Author Janna

Ingredients

  • 3 Eggs Room temp
  • 3 tbsp ghee, melted or melted organic palm shortening Cooled to room temp
  • 1 tsp pure vanilla extract
  • 3 tbsp orange juice
  • 1 tbsp orange zest, grated from organic orange
  • 2/3 cup Pure Maple Sugar
  • 1/3 cup Tapioca Flour
  • 2 cups Blanched almond flour
  • 1/2 tsp baking soda
  • 1/4 tsp salt
  • 1/3 cup dark chocolate chips Enjoy Life brand {GF, DF, Vegan, Paleo}

Instructions

  1. Preheat your oven to 350 degrees and prepare muffin pans:  I used silicone muffin pan which make for easy removal of muffins and I still grease it lightly.  If using a non-silicone pan, be sure to grease pan well.  If using muffin liners, you may want to lightly grease both top rings of pan and liners. You could also cut parchment paper circles by tracing the size of you muffin pan and cutting parchment papers circles to line the bottom of each muffin hole.

  2. In a mixing bowl, beat eggs, juice, zest, melted ghee or shortening, vanilla and sugar until creamed together.  In a separate bowl, combine almond flour, tapioca flour, baking soda and salt.  Add dry ingredients to mixing bowl and mix until combined.

  3. Fill standard size muffin cups about half full.  Sprinkle chocolate chips over top of muffin batter and bake in preheated oven for 28-32 minutes. or until done in center.

  4. Cool in muffin pan 10-15 minutes and using a knife to release edges from pan, transfer muffins to a wire rack until completely cooled before serving.

Recipe Notes

If using a silicone muffin pan, place the muffin pan on a baking sheet prior to filling the batter into the cups. This makes it so much easier to transfer the muffins in and out of the oven! 😉

Spread the love

Cookie Crazy!

I have had the BIGGEST sweet tooth this past week! It is close to 90 days since I have has any sugar or even any non-whole foods. The urge to get back into the kitchen and do some paleo baking was getting strong! Combined with my current obsession of cinnamon and I did what any logical thinking person would do and baked some snickerdoodles! I have to admit, I was not expecting to be able to handle the dough enough to roll it in the coconut sugar, but I was proven wrong! The dough handled beautifully!

You can bake these without rolling in sugar or you can roll in maple sugar or coconut sugar which will result in a darker cookie. I tried all three options and they all have a slightly different experience!

Baking notes: I use silicone baking liners on my baking sheets and the cookies still get a crispy exterior. However, parchment paper can also be used as a liner on baking sheets.
I also used two different size cookie scoops (40mm and 50mm), and the smaller one yielded 24 cookies and the larger cookie scoop 22 cookies. I also prefer the slightly smaller size, but even teaspoons will work to make dough balls!

I have been on a coconut free diet (thanks to my naturopath) for several weeks and successfully made these delicious snickerdoodles without coconut! See the notes after the recipe for instructions if you are avoiding coconut too! Either way, my boys repeatedly exclaimed how delicious these were! I think they love cinnamon as much as their mom.

These do need to cool on the pan before transferring to a cooling rack, but they are not fragile, stack and store easily. These cookies have an awesome texture and just the right sweetness, they hit the spot!

Snickerdoodle Cookies {GF, DF, Paleo}

Crispy on the outside, chewy on the inside, irrisitably delicious!  Can also be made without coconut flour and/or oil!

Course Dessert
Servings 2 Doz
Author Janna

Ingredients

  • 1/3 cup Almond Butter, smooth
  • 1/2 cup Pure Maple Syrup
  • 1/4 cup Organic refined Coconut Oil Melted and cooled to room temp
  • 1 1/2 cups Blanched Almond Flour
  • 1/4 cup Coconut flour
  • 1 tsp Pure Vanilla extract
  • 1/2 tsp Baking Soda
  • 1/4 tsp Salt
  • 1 Tbls Cinnamon, ground
  • 3 Tbls Maple Sugar or Coconut Sugar
  • 1 Tbls Cinnamon, ground

Instructions

  1. Preheal Oven to 350

  2. Combine dry ingredients in a medium bowl and set aside.

  3. In a mixing bowl, cream together almond butter, coconut oil (meausre after melted!), maple syrup and vanilla.  Add dry ingredients and mix until dough forms.  It will be a sticky dough.  Place dough in refridgerator while preparing baking sheets, 5+- minutes.

  4. Prepare baking sheets with parchment paper or silicone baking mats.

    In a small bowl mix maple sugar and 1 Tablespoon cinnamon, mix together.  

  5. Using a small cookie scoop or teaspoons, make a ball with hands and roll in sugar mixture. Once coated, place on baking sheet. 

  6. Bake 11-13 minutes, until you see the bottom edges slightly brown.

  7. Cool on baking sheet until firm enough to transfer to wire cooling rack.

Recipe Notes

To make these snickerdoodle cookies without coconut oil and/or coconut flour, I used 2 1/4 cups almond flour and 1/4 cup tapioca flour and omitted the coconut flour. I also used ghee in place of the coconut oil, but grass fed butter would also be a replacement. This dough will still sticky, but will hold a ball shape and be able to be rolled in maple sugar/cinnamon mix if desired. I would suggest using a small cookie scoop or using a tablespoon to make balls by hand.

Spread the love

Cookie Kind of Day

I tried a few different versions of this cookie today: rolled in coconut, larger chunk, finer texture, rolled, flattened, with orange juice, without. In the end, they were all delicious, but there was one clear winner!

Granola & Date Cookies

Turn your homemade Grain Free Granola into delicious cookies that are perfect for sharing!

Author Janna

Ingredients

  • 1 1/2 Cups Grain Free Granola
  • 1 Egg
  • 1/4 tsp Salt
  • 1 tsp Vanilla extract, pure
  • 4-5 Medjool Dates very ripe (soft)
  • 1 Tbsp Pure Maple Syrup optional
  • 1/2 cup Shredded Coconut optional

Instructions

  1. Preheat Oven to 350.  Prepare baking sheet with silicone liner or parchment paper.

  2. In a food processor, add granola and pulse until medium texture. Add medjool dates and continue pulsing until fine texture. If dates are hard, soak in hot water for a few minutes before adding to food processor.

  3. In a separate bowl, beat egg and add vanilla, maple syrup and salt. Add granola and dates to bowl and stir to combine.

  4. Dough should be firm enough to roll into a ball, (may want to wet hands first)  or use a cookie scoop and place directly onto cookie sheet, or roll in shredded coconut before placing on cookie sheet.  Press ball down gently with hand or bottom of a glass.  
  1. Bake 12-14 minutes.  Cool on pan before removing.

Spread the love

3 Ingredient Pancakes (Really 5!)

3 Ingredient Pancakes (Wait! Make that 5 Ingredients)

3 ingredient pancakes: much better with 5 ingredients! I added a little vanilla and a little pink salt and these are working!

Author Janna

Ingredients

  • 2 egg
  • 1 very ripe bananas
  • 1 teaspoon cinnamon
  • 1/2 tsp pure vanilla extract
  • 1/4 tsp sea salt

Instructions

  1. Mash bananas well, add in remaining ingredients and mix thoroughly.

    Heat non-stick skillet over low-medium heat.

    Coat with coconut oil or avocado oil

    add 1/3 cup of bather to pan and cook 3-4 minutes on each side.

    Serve alone or drizzle with almond butter, berries and honey or pure maple syrup!

    Serve alone or drizzle with almond butter, berries and honey or pure maple syrup!

Spread the love

Let’s Get Cooking with Granola!

Grain Free Granola

I have been out of granola for the past week and have been wishing it would just magically appear in my cupboard. However, you cannot buy granola that tastes as wonderful as homemade, and bonus, you can control the size, type and texture of the nuts you like and customize all of the other ingredients to fit your tastes and needs.

I don't know why I have been procrastinating on whipping up a new batch! It literally takes 5 minutes of prep and 25 minutes in the oven. It is the perfect quick snack and it can be used so many different ways at all times of the day, which is how I ran out in the first place!

Today I decided to really stock up and made three different variations, one with coconut, one without coconut and one with dried cherries (I had half a bag in my pantry)!

Granola is a simple, nutritious, and delicious go-to that isn't a huge leap if you are new to the grain free, sugar free lifestyle like me!

You can get creative and use the recipe below as a model, adding different nuts or different sizes. I like slivered almonds while my kids like whole almonds. I have found that shredded coconut is just too messy if eating granola as a snack and coconut flakes or chips are perfect! So get in the kitchen and get started, finding the best mix for you!

Ingredients

  • 2 Cups Raw Almonds slivered or whole, depending on your preference
  • 1 1/4 Cup Raw Pecans
  • 1 Cup Raw Walnuts
  • 1/2 Cup Raw Cashews or Cashew Pieces
  • 1/4 teaspoon Sea Salt
  • 3 Tablespoons Coconut Olive or Avocado Oil
  • 1 teaspoon Pure Vanilla Extract -optional
  • 1 Tablespoon Pure Maple Syrup -optional
  • 1 1/2 teaspoon Ground Cinnamon
  • 1/2 Cup Coconut Flakes or Chips -optional
  • 1/4 Cup Raw Pumpkin Seeds
  • 1/4 Cup Dried Blueberries or Dried Cherries -optional

Instructions

  1. Preheat oven to 325
  2. Measure all dried ingredients (except dried fruit) in a mixing bowl and set aside.
  3. Melt coconut oil in saucepan over low heat and add vanilla and maple syrup. Once oil is melted, remove from heat and pour over dried ingredients and mix thoroughly.
  4. Spread mixture on a baking sheet and bake for a total of 25-28 minutes, 20 minutes if adding dried fruit.
  5. If adding dried fruit, pull out of oven after 20 minutes and stir in the dried fruit. Return to oven for the remaining 5-8 minutes.
  6. Remove from oven and let cool completely.
Spread the love